When your emails start bouncing back with “DKIM verification failed” errors, it can feel like your entire email infrastructure is crumbling. This cryptic error message signals that receiving mail servers can’t validate your DKIM (DomainKeys Identified Mail) signatures, potentially landing your messages in spam folders or blocking them entirely.
DKIM verification failures affect over 25% of organizations at some point, often without their knowledge. Unlike obvious delivery failures, DKIM signature issues can silently damage your sender reputation while you remain unaware that your authentication is broken.
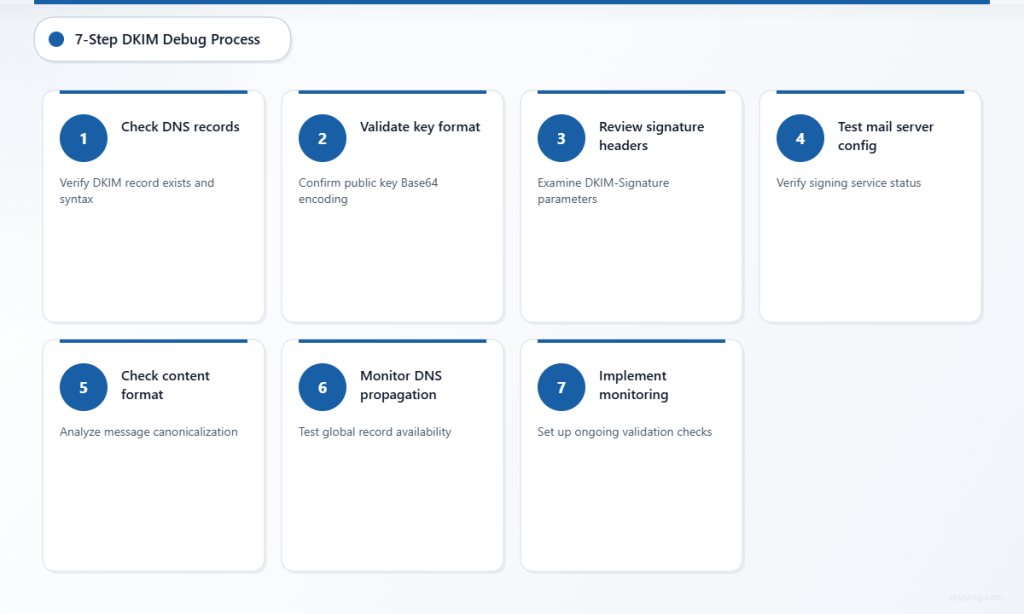
This systematic 7-step debug process will help you identify, troubleshoot, and resolve DKIM verification failures quickly, ensuring your emails reach their intended recipients with proper authentication.
I. Understanding DKIM Verification Failures
DKIM verification failed errors occur when receiving mail servers cannot successfully validate the cryptographic signature attached to your emails. This authentication method proves that your messages haven’t been tampered with during transit and confirms they originate from your authorized mail servers.
II. Common symptoms of DKIM verification failures include:
- Increased spam folder placement
- Higher bounce rates from major email providers
- Delivery delays or complete blocking
- Authentication failure reports in email headers
- Declining sender reputation scores
The verification process involves multiple components working together: your DNS records, mail server configuration, signing keys, and message formatting. When any element fails, the entire authentication chain breaks down.
III. Step 1: Check DKIM DNS Record Status
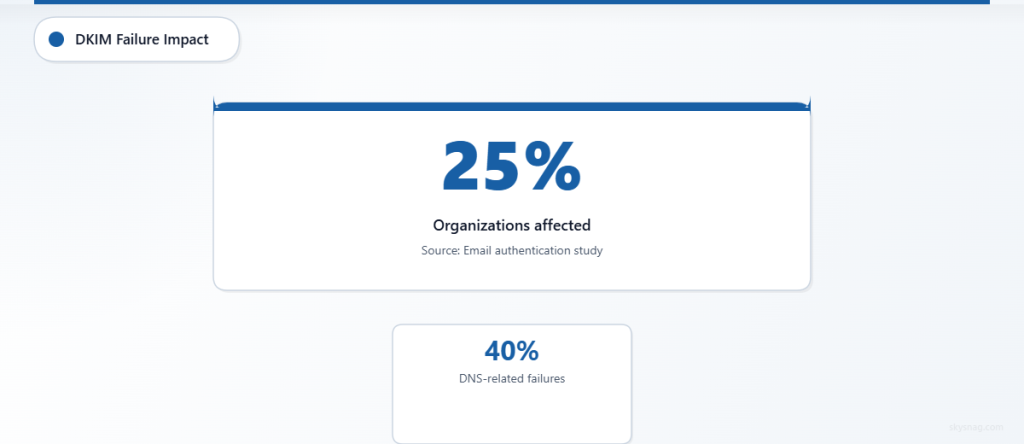
Start your debugging process by verifying your DKIM DNS records are properly published and accessible. DNS issues cause approximately 40% of DKIM verification failures, making this your most critical first step.
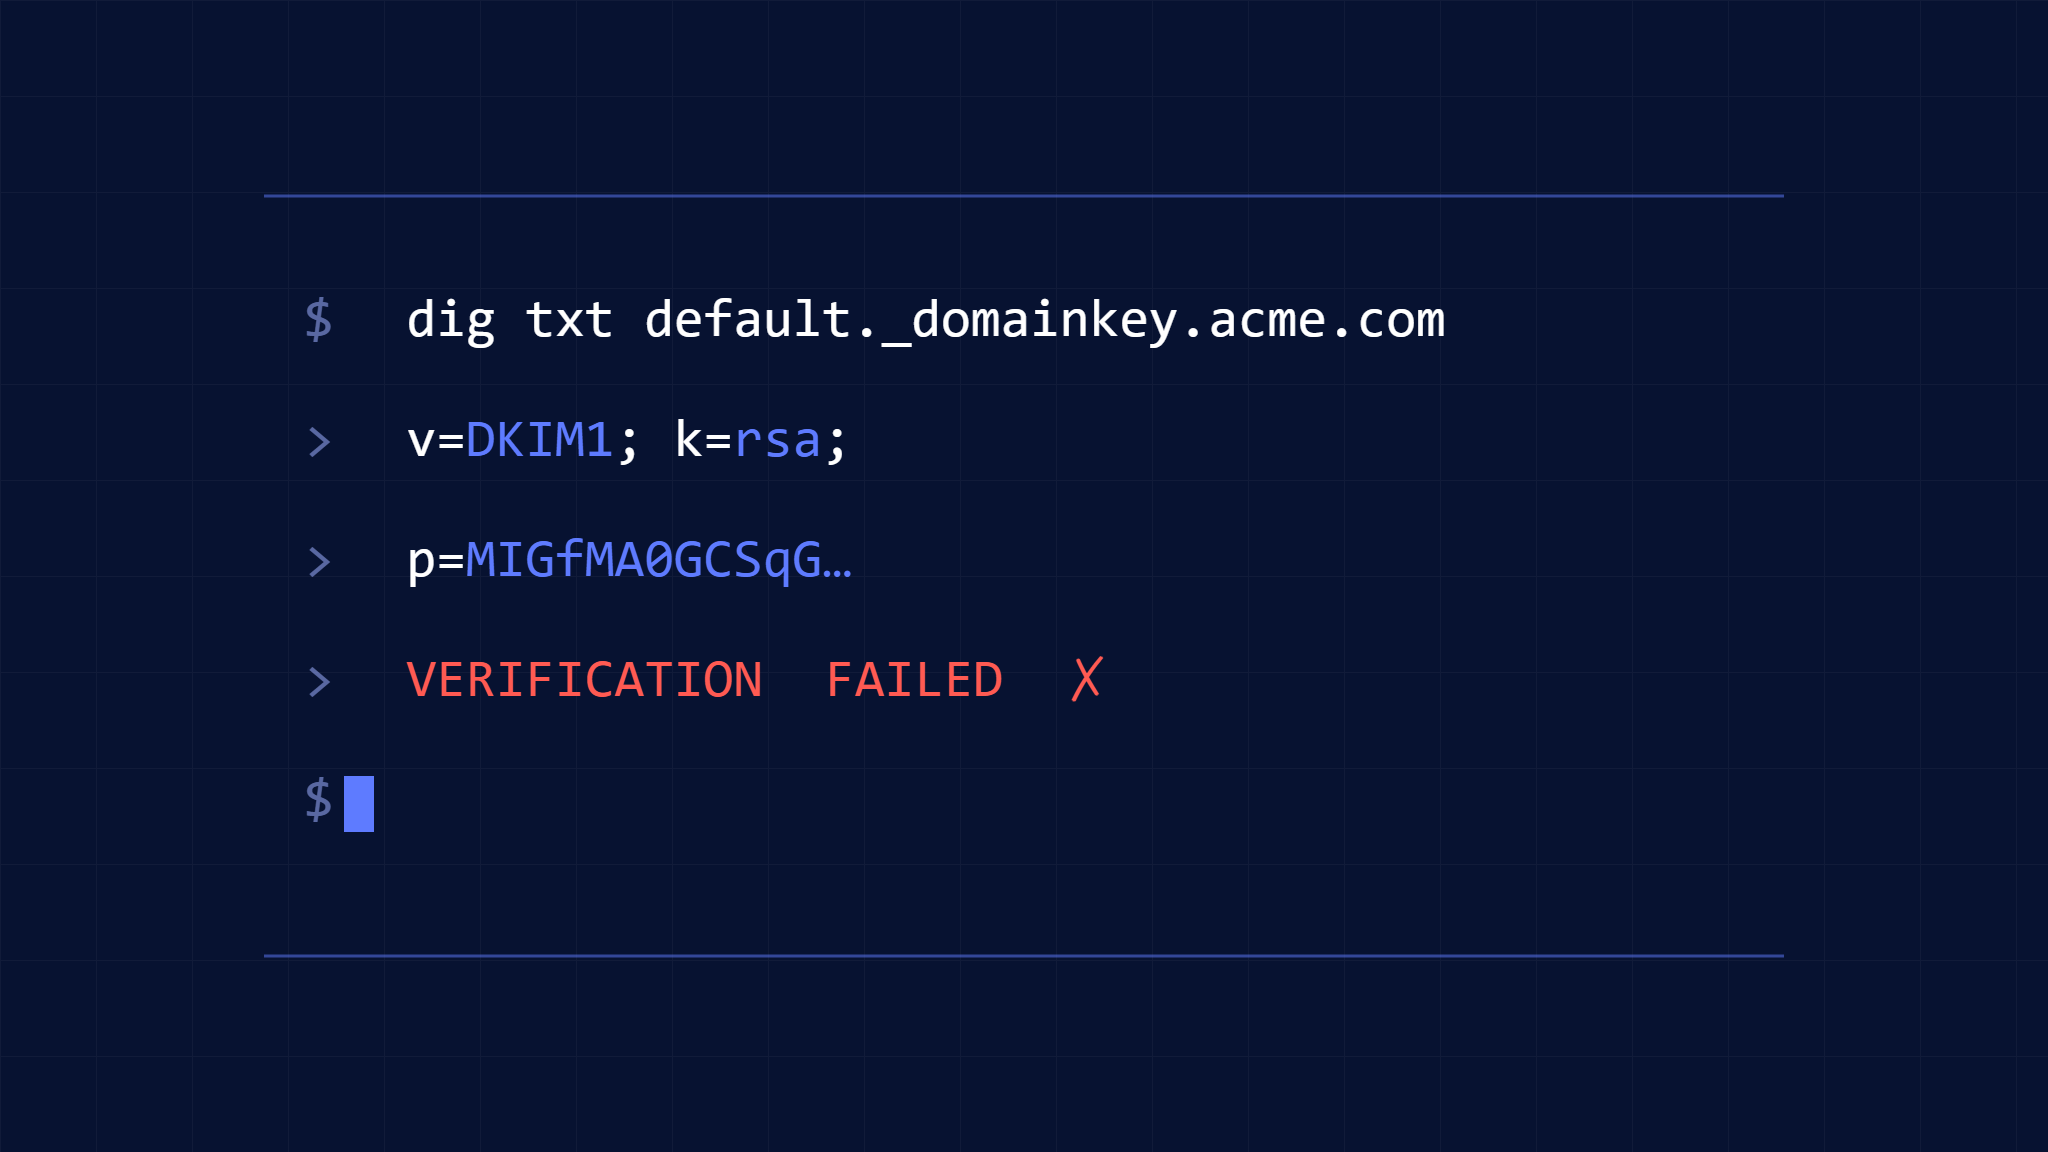
Use these command-line tools to check your DKIM record:
dig TXT selector._domainkey.yourdomain.com
nslookup -type=TXT selector._domainkey.yourdomain.com
Replace “selector” with your actual DKIM selector name. Look for a TXT record containing:
v=DKIM1(version identifier)k=rsa(key type)p=followed by your public key
Common DNS problems to identify:
- Missing DKIM record entirely
- Incorrect selector name in DNS
- Malformed public key syntax
- DNS propagation delays
- TTL settings causing caching issues
If your DNS query returns no results or shows formatting errors, your DKIM record needs republishing. Contact your DNS administrator or update your DNS management console with the correct record format.
Pro tip: Test your DKIM record from multiple geographic locations using online DNS checker tools to ensure global propagation has completed.
IV. Step 2: Validate Public Key Format and Length
DKIM public keys must follow specific formatting requirements. Even minor syntax errors will cause verification failures across all receiving servers.
Your DKIM public key should:
- Use Base64 encoding without spaces or line breaks in DNS
- Typically be 1024-bit or 2048-bit length (2048-bit recommended for security)
- Begin with standard RSA key formatting
- Match exactly between your mail server and DNS record
Validation checklist:
- Compare the public key in your DNS record with your mail server configuration
- Verify no extra characters, spaces, or formatting issues exist
- Confirm the key length meets current security standards
- Test the key formatting with DKIM validation tools
Many DKIM failures stem from copy-paste errors when publishing keys to DNS. Even invisible characters can break the validation process completely.
If your public key appears corrupted or doesn’t match your mail server, regenerate a new DKIM key pair and update both your mail server configuration and DNS records simultaneously.
V. Step 3: Examine DKIM Signature Headers
Analyze the DKIM-Signature headers in your outbound emails to identify signing problems. These headers contain crucial information about how your mail server is applying DKIM signatures.
Key header components to examine:
v=1(signature version)a=rsa-sha256(signing algorithm)c=relaxed/relaxed(canonicalization method)d=yourdomain.com(signing domain)s=selector(selector name)h=(signed header fields)b=(signature value)
Common signature header issues:
- Missing required headers like From or Subject
- Incorrect domain name in the
d=parameter - Wrong selector name that doesn’t match DNS
- Algorithm mismatches between signing and verification
- Malformed signature encoding
Use email analysis tools or examine raw message headers to inspect DKIM-Signature formatting. Pay special attention to the header canonicalization settings, as mismatches here often cause verification failures.
VI. Step 4: Test Mail Server Configuration
Your mail server’s DKIM implementation must be properly configured to sign outgoing messages correctly. Configuration errors often develop gradually as server updates or changes accumulate.
Mail server configuration checklist:
For Postfix:
- Verify OpenDKIM service is running
- Check
/etc/opendkim.conffor correct domain and selector settings - Ensure proper key file permissions (600 for private key)
- Confirm socket communication between Postfix and OpenDKIM
For Exchange Server:
- Validate DKIM signing policies in Exchange Admin Center
- Check certificate installation and expiration dates
- Verify connector settings for DKIM signing
- Test message flow with protocol logging enabled
For cloud email services:
- Review DKIM enablement settings in your admin console
- Confirm custom domain DKIM configuration
- Check for any pending verification steps
- Validate selector and key settings match DNS records
Testing commands:
# Test OpenDKIM configuration
opendkim-testkey -d yourdomain.com -s selector

# Check service status
systemctl status opendkim
Document your current configuration before making changes, and test DKIM signing with a single test message before applying changes broadly.
VII. Step 5: Analyze Email Content and Formatting
Message content and formatting can interfere with DKIM signature validation. Modern email systems modify messages during transit, potentially breaking signatures that cover modified content.
Content factors affecting DKIM verification:
- HTML formatting inconsistencies
- Attachment encoding changes
- Character set conversions
- Line ending modifications (CRLF vs LF)
- Mail relay modifications
Best practices for DKIM-compatible content:
- Use standard character encodings (UTF-8)
- Avoid complex HTML structures that relays might modify
- Keep message headers consistent and well-formatted
- Test with both plain text and HTML message versions
- Monitor for content scanning modifications
Many email security gateways and spam filters modify message content, breaking signatures created by the sending server. Consider using “relaxed” canonicalization settings to allow minor modifications without failing verification.
Skysnag Protect provides comprehensive DKIM monitoring and validation, automatically detecting content-related signature failures and recommending configuration adjustments to improve deliverability.
VIII. Step 6: Monitor and Debug DNS Propagation
DNS propagation delays and inconsistencies cause intermittent DKIM verification failures. While you might see successful verification from some locations, other regions may still have cached outdated records.
DNS monitoring strategy:
- Check DNS propagation across multiple global resolvers
- Monitor TTL settings and adjust if necessary
- Verify authoritative name servers are responding correctly
- Test from different ISPs and geographic regions
Tools for DNS validation:
- Multiple DNS lookup services
- Global DNS propagation checkers
- Command-line testing from various servers
- Continuous monitoring for consistency
Set DNS TTL values appropriately: use longer TTLs (3600+ seconds) for stable DKIM records, but shorter values (300-900 seconds) when making changes to speed propagation.
If you discover propagation inconsistencies, wait for full global propagation before troubleshooting other components. Premature configuration changes often complicate diagnosis.
IX. Step 7: Implement Comprehensive Testing and Monitoring
Establish ongoing DKIM monitoring to prevent future verification failures. Reactive troubleshooting catches problems after they’ve already impacted email delivery and sender reputation.
Monitoring implementation:
Automated testing:
- Regular DKIM signature validation checks
- DNS record monitoring for changes or failures
- Mail server configuration drift detection
- Authentication report analysis (DMARC reports)
Key metrics to track:
- DKIM pass rates by receiving domain
- DNS query success rates for your DKIM records
- Mail server signing performance
- Authentication failure trends
Testing schedule recommendations:
- Daily: Automated DKIM signature validation
- Weekly: Comprehensive DNS propagation checks
- Monthly: Mail server configuration reviews
- Quarterly: DKIM key rotation planning
Set up alerts for DKIM verification failures, DNS record changes, and authentication rate drops. Early detection prevents small configuration issues from escalating into major delivery problems.
Consider implementing DMARC reporting to receive detailed authentication feedback from major email providers. These reports reveal DKIM verification patterns and help identify systemic issues.
X. Advanced Troubleshooting Tips
When standard debugging steps don’t resolve DKIM verification failures, consider these advanced techniques:
Key rotation issues: If you’ve recently rotated DKIM keys, ensure both old and new selectors remain active during the transition period. Abrupt key changes can cause verification failures for cached DNS records.
Multi-server environments: Verify all outbound mail servers use identical DKIM configurations. Inconsistent signing across servers creates unpredictable verification results.
Third-party service integration: Check if email marketing platforms, CRM systems, or other services sending on your behalf have proper DKIM configuration. These services often require separate authentication setup.
Algorithm compatibility: While RSA-SHA256 remains the standard, some legacy systems may require specific algorithm configurations. Test compatibility with your primary receiving domains.
XI. Preventing Future DKIM Failures
Implement these proactive measures to minimize future DKIM verification failures:
- Configuration documentation: Maintain detailed records of your DKIM setup, including key generation dates, selector names, and configuration files.
- Change management: Establish procedures for mail server updates that include DKIM configuration validation.
- Monitoring integration: Incorporate DKIM checking into your broader email infrastructure monitoring.
- Regular audits: Schedule periodic reviews of your complete email authentication setup, including SPF, DKIM, and DMARC.
- Backup configurations: Maintain backup DKIM selectors and keys for rapid recovery from failures.
Skysnag Protect offers comprehensive email authentication monitoring and management, providing real-time alerts for DKIM verification failures and automated remediation guidance to maintain optimal email deliverability.
XII. Key Takeaways
DKIM verification failures require systematic debugging to identify and resolve authentication issues effectively. Start with DNS record validation, examine mail server configuration, and analyze message formatting to pinpoint the root cause.
Implement ongoing monitoring to catch DKIM problems before they impact email delivery. Regular testing and proactive configuration management prevent minor issues from escalating into major authentication failures.
Remember that DKIM works as part of a broader email authentication strategy alongside SPF and DMARC. Maintain all three authentication methods for optimal email security and deliverability.
Ready to eliminate DKIM verification failures and protect your email reputation? Skysnag Protect provides comprehensive email authentication monitoring, automated DKIM validation, and expert guidance to ensure your messages reach their intended recipients with proper authentication every time.