Millions of organizations use Office 365 worldwide which makes it a likely target for phishing attacks. It is critical to set up DMARC to prevent email spoofing and phishing if you use Office 365. DMARC might sound daunting, but the help of this article will help you understand how you can automate it for your domain and enjoy its benefits.
I. What is the Office 365 DMARC?
Before diving into the technical details, let us first understand what DMARC is. DMARC is an email validation technique designed to help email receivers verify the authenticity of emails sent from your domain. In addition, it protects your company’s email domain against cyberattacks such as email spoofing, phishing scams, and other cybercrimes.
Office 365 DMARC complements existing email authentication techniques such as SPF (Sender Policy Framework) and DKIM (Domain Keys Identified Mail). It features an important function, ‘reporting.’ When a domain owner implements a DMARC record into their DNS record, they get control over the email sent through their domain. They can gain information on who is sending emails on their behalf.
II. Benefits of DMARC setup
As mentioned above, DMARC protects your domain. But apart from preventing phishing or spoofing attacks, it also positively impacts email delivery. For a website owner, it guarantees that your customers or users only receive emails you have sent yourself. Furthermore, as an email receiver, you feel more secure as the email received would be originating from the sender’s domain!
DMARC office 365 also makes it easier for ISPs (Internet Service Providers ) to stop malicious email practices. Therefore, it is a must for every domain owner to set up DMARC.
III. What is the DMARC record?
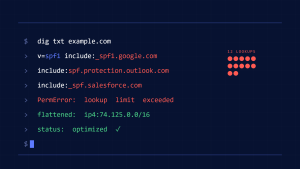
A DMARC record is a DNS TXT record that allows you to control how your email is handled if it fails DMARC authentication. A DMARC record example is “_dmarc.yourdomain.com.”
The DNS TXT record contains the DMARC policy, which informs email servers like Gmail, Yahoo!, and Microsoft’s Office 365 if a domain is set up for DMARC.
By using DMARC records you can instruct servers on how to deal with emails that fail authentication. For example, you can ask them to ignore them or quarantine them in a spam folder.
Remember that not all servers check DMARC records before accepting a message. However, most ISPs conduct DMARC tests, and the implementation is growing further.
Read along to find out How to Set Up a DMARC record to ensure your emails and deliverability rates are well-protected.
IV. How to set up DMARC O365?
Coming on to the main question, which is how to conduct DMARC configuring on your office 365 custom domain email. Let us split the answer into two categories; inbound and outbound mail.
- For inbound mail, Office 365s automatically validates DMARC, regardless of whether it is hosted on a custom domain or not.
- For outbound mail, for users not hosted on a custom domain, their DMARC records get handled automatically.
However, users with custom domains must perform DMARC configuring themselves and enable it for outbound mails.
V. How to Add a DMARC record to Office 365?
Before you begin, here are a few things to keep in mind:
- Before enforcing DMARC, you must set up office 365 SPF (Sender Policy Framework office 365) and DKIM (DomainKeys Identified Mail) beforehand.
- Your custom domain should be connected to your Office 365 account and verified.
VI. Step to create DMARC record.
1: Navigating to the DNS manager
- Before DMARC adjusting takes place, navigate to your DNS manager by going to your domain registrar and
- DMARC policies are in the form of a TXT file. To generate a DMARC record, add a new file to your DNS records.
- Create a Skysnag account to generate your DMARC record
2: Managing the DMARC policy through Skysnag.
This is managed automatically from within Skysnag under “Enforcement Settings” in the Skysnag Dashboard.
The policy is stored in the “p” tag, and there are 3 types of policies to choose from:
- None: p=none
This policy tells the receiving server to treat the messages as if there is no DMARC in place. However, it still generates a report.
- Quarantine: p=quarantine
This policy tells the receiving server to receive the message anyway but separates it into a spam folder.
- Reject: p=reject
This policy tells the receiving server to reject the message altogether. It doesn’t land in any inbox or folder.
If one doesn’t have a DMARC record in place, they should start with the none policy. This allows them to monitor email activity without impacting deliverability. DMARC reports get to check the configuration of your SPF record for office 365 and DKIM records.
Step 3: Add an email address
Another step to getting the DMARC record published is to add an email ID to where reports can be sent.
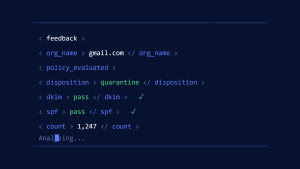
Aggregate reports are sent daily as an XML file and give you an overview of the email traffic, like the sender’s IP address, when the email was sent, and authentication results. To specify where to send these reports, use the “rua” tag.
These reports can be sent to multiple email addresses. Just add a comma between addresses, like in the example below:
rua=mailto:[email protected],mail to:[email protected];
Apart from aggregate reports, there can be failure or forensic reports. However, these reports are redundant as they are not as beneficial as aggregate reports.
Step 4: Creating the TXT record value
For creating the TXT record, you need to combine the previous components discussed above in the “value” field.
Step 5: Create a Skysnag account here to generate your DMARC record
In the end, your first DMARC record might end up looking like this:
v=DMARC1; p=none; rua=mailto:[email protected];
Only the “rua” tag is optional in the above template. However, it is also essential to set it up because it lets you receive aggregate reports. Getting these reports can be helpful as they contain important data
After creating the TXT file, your first DMARC report will be available within 72 hours. However, if you make that text file, you can inadvertently affect the deliverability of emails without realizing it. Start with a p=none policy to avoid this.
VII. Conclusion
Shift to DMARC enforcement safely by starting your DMARC journey with Skysnag. DMARC is essential for safeguarding email traffic from phishing and fraud. Get started with Skysnag by signing up using this link for a free trial and protect your organization from phishing attacks.