
DKIM is specified in RFC 6376, and it is used by a number of email service providers, including Google, Yahoo, and Microsoft. DKIM is designed to address some of the flaws in the existing email system, such as spoofing, phishing, and message tampering. It allows email senders to digitally sign their messages in a way that can be verified by email receivers. This allows receivers to verify that the message truly came from the sender, and has not been tampered with.
I. Step by Step instructions to connect a domain to HubSpot.
- Open your HubSpot account and log in.
- Click the “settings icon” in the main navigation bar.
- In the left sidebar menu, select Website > Domains & URLs.
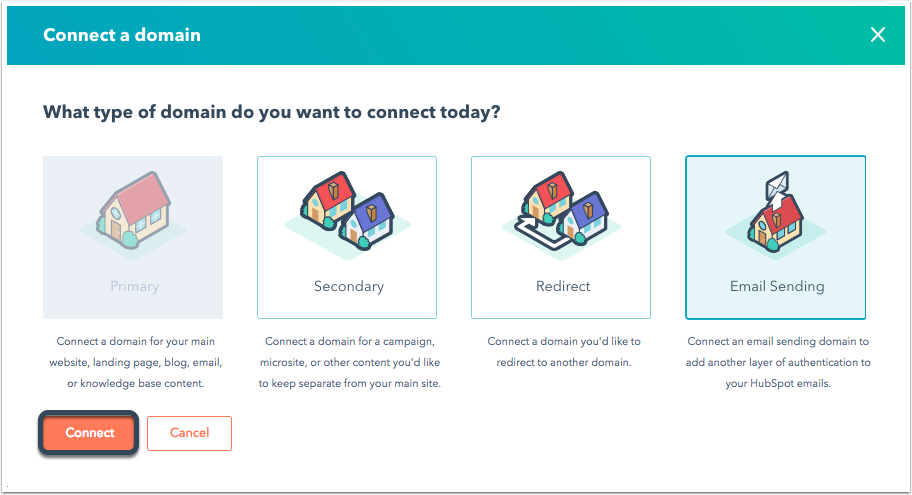
- Click “Connect” a domain.
- In the dialog box, choose Email Sending, and then click “Connect.” You will then be taken to the domain connection screen.
II. How to select a Domain
- On the domain connection screen, enter the email address used to send emails from that domain, then click “Next.”
- On the following screen, confirm the email sending domain then click “Next.”
III. How to Verify URLs in your DNS provider?
This is the final step to Setting up DKIM for Hubspot. Follow the following steps
- Sign in with your DNS provider in a separate tab, then click I’m logged in checkbox in HubSpot after you’ve done so.
- In the DNS service provider, In HubSpot, navigate to DNS settings and click I’m there checkbox.
- Go to the Update your DNS records area in HubSpot, click Copy next to the Host(name) column value, and then paste it in the corresponding field of the DNS provider.
- In a similar manner, in the HubSpot Value column, select the value, click Copy, and then paste the result into the appropriate box at the DNS provider.
Remember, you must add _domainkey if you’re connecting a subdomain to HubSpot.
- Select the Done checkbox in HubSpot after making the necessary changes to the DNS provider’s data.
- If your DNS records are configured properly, you will get a Verified message, indicating that your email sending domains have been verified. To take effect, this could take up to 24 hours.
- On the validated message, click Done.
- You will see a Record Invalid error shown to the right of the record if your DNS records are not configured or are still being processed (s). To verify whether the changes have been changed, click on Check them again.