DomainKeys Identified Mail (DKIM) is a method for email senders to digitally sign email messages in a way that can be verified by email receivers. This allows receivers to verify that the message truly came from the sender, and has not been tampered with. DKIM is intended to address some of the flaws in the existing email system, such as spoofing, phishing, and message tampering.
I. How to set up MailChimp to use DKIM
The procedures required to set up DKIM for emails sent from your domain using MailChimp are described in this article. The following are some benefits of securing your domain on MailChimp:
- It makes it appear as though your domain, not MailChimp, is sending out your emails.
- This raises the likelihood that your recipients will click on the emails, which improves email deliverability
II. Making Your Domain in MailChimp Verifiable
You must first authenticate your domain before you can start setting up DKIM in Mailchimp.
When confirming your domain:
- Enter your MailChimp login information.
- Go to Settings > Accounts.
- Select “Domains.”
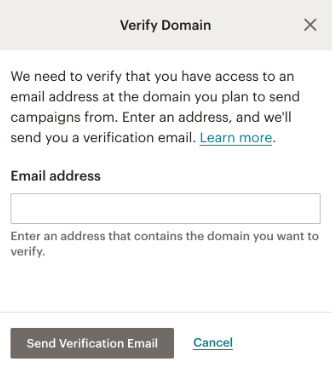
- Click “Verify Domain” on the Manage Domains page.

- When prompted, enter your email address to which the verification link will be sent in a dialog window, then select “Send Verification Email.”
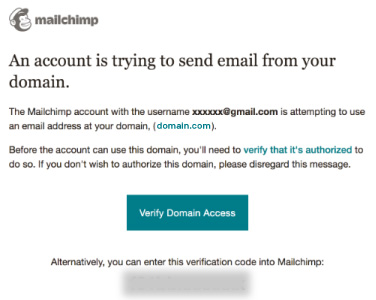
- After setting up your email account, click the “Verify Domain Access” option. As an alternative, you can validate your domain using the provided verification code.
III. DKIM Configuration for Your Domain
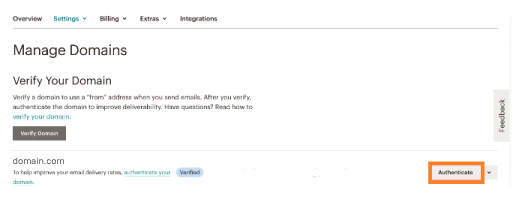
Click the “Authenticate” on the Manage Domains page after validating your domain.
The values for the CNAME record you must set up in order to configure DKIM will be displayed in a dialogue box. It instructs you to set up a CNAME record with the following value for k1. domainkey.domain.com:
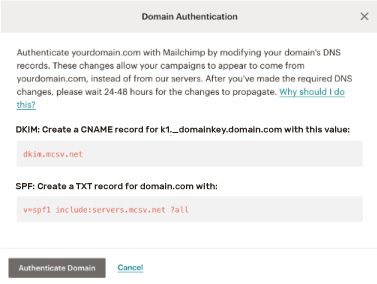
The full record will appear as follows:
| Record Type | Name | Value | TTL |
| CNAME | k1._domainkey.domain.com | dkim1.mcsv.net | default |
In your DNS, publish the CNAME entry and wait up to 24 to 48 hours. To configure DKIM and finish the authentication process, click “Authenticate” Domain in the dialog box.
You can use Skysnag’s free DKIM Checker to check the health of your DKIM record here
Enable DMARC for your domains to protect against spoofing. Sign up for a free trial today!
For more information on MailChimp DKIM setup, you can refer to their reference documentation